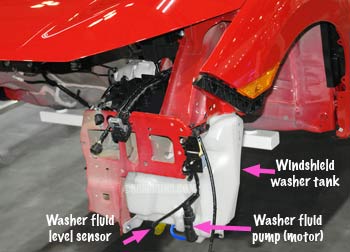
<p>Removing a windshield washer pump on a minivan looks like a simple job: drain the reservoir, disconnect the wiring, pull the pump, and replace it. In practice, minivans often have tight engine bays, hidden reservoirs, plastic mounting grommets, and multiple washer circuits. Small mistakes can crack the reservoir, damage wiring, cause leaks, or lead to a replacement pump that still does not spray. Avoiding the most common errors starts with knowing the pump location, preparing the system, and handling the plastic components carefully.</p>
<h2>Assuming Every Minivan Uses the Same Pump Location and Mounting</h2>
<p>Minivans differ widely in how the washer pump is mounted. Some reservoirs sit behind the front bumper cover, others are tucked under the fender liner, and some are mounted near the master cylinder or battery. The pump itself may be pressed into a rubber grommet, threaded into the tank, or part of a larger washer module.</p>
<p>Common mistakes include:</p>
<ul>
<li>Trying to remove the pump from the top without checking for hidden fasteners or brackets.</li>
<li>Forcing the pump out before confirming whether it twists, pulls straight, or has a retaining tab.</li>
<li>Confusing the front washer pump with the rear washer pump or headlight washer pump.</li>
<li>Ordering a replacement by sight instead of using the VIN or exact part number.</li>
<li>Removing the reservoir when only the pump needs to be replaced.</li>
</ul>
<p>Practical tips:</p>
<ul>
<li>Check service information for the exact model and year before starting.</li>
<li>Locate the electrical connector and hose first. If the pump is behind a fender liner, turn the wheels or remove the wheel for better access.</li>
<li>Identify the pump type. Many grommet-mounted pumps require a quarter-turn twist before pulling.</li>
<li>If the minivan has front and rear washers, label the connectors and hoses before removal.</li>
</ul>
<h2>Skipping Fluid and Electrical Prep</h2>
<p>Washer fluid is slippery, conductive, and messy. Skipping preparation turns a small repair into a cleanup job or an electrical problem. The pump circuit may also be live even with the key off on some vehicles, so careless contact can blow fuses.</p>
<p>Common mistakes include:</p>
<ul>
<li>Not draining the reservoir before removing the pump.</li>
<li>Pulling the connector by the wires instead of releasing the locking tab.</li>
<li>Leaving the battery connected when working near exposed wiring or a fuse box.</li>
<li>Replacing the pump without checking the fuse, relay, or washer switch first.</li>
<li>Mixing up front and rear washer hoses.</li>
<li>Dropping small connectors, grommets, or screws into the engine bay.</li>
</ul>
<p>Practical tips:</p>
<ul>
<li>Use a syringe, turkey baster, or vacuum extractor to remove most of the fluid.</li>
<li>Place a drain pan and towels under the reservoir before pulling the pump.</li>
<li>Disconnect the negative battery terminal when service information recommends it, especially if the pump wiring is near the battery or fuse box.</li>
<li>Take a photo of the hose routing and connector orientation before disassembly.</li>
<li>Test the old pump with a known good power source only if you can do so safely. If it runs, the problem may be a fuse, relay, switch, or clogged line.</li>
</ul>
<h2>Forcing the Pump Out and Damaging the Reservoir</h2>
<p>The washer reservoir is usually made of thin plastic. It cracks easily when pried, twisted, or used as a leverage point. The pump grommet can also harden with age, making the pump feel stuck. Forcing it can separate the pump strainer, tear the grommet, or push plastic debris into the tank.</p>
<p>Common mistakes include:</p>
<ul>
<li>Prying against the reservoir with a screwdriver or metal tool.</li>
<li>Pulling the pump by the hose or electrical connector.</li>
<li>Twisting the pump in the wrong direction.</li>
<li>Reusing a hardened or torn grommet.</li>
<li>Installing the new pump without cleaning the mounting hole.</li>
<li>Ignoring cracks, sludge, or debris inside the reservoir.</li>
</ul>
<p>Practical tips:</p>
<ul>
<li>Use plastic trim tools if any prying is needed.</li>
<li>Twist the pump slightly while pulling only after confirming the correct release method.</li>
<li>Replace the grommet or O-ring whenever you replace the pump. It is inexpensive and prevents leaks.</li>
<li>Clean the mounting area before removal so dirt does not fall into the reservoir.</li>
<li>Inspect the reservoir for cracks. If it is brittle or damaged, replacing the reservoir may be more reliable than reinstalling the pump.</li>
</ul>
<h2>Reinstalling Without Priming, Seating, or Testing Correctly</h2>
<p>A new washer pump can fail immediately if it is installed dry, crooked, or with the hoses reversed. The pump may run but not spray, or it may leak only after the reservoir is filled. Testing all washer functions before closing the hood prevents a repeat repair.</p>
<p>Common mistakes include:</p>
<ul>
<li>Installing the pump dry and running it before filling the reservoir.</li>
<li>Pushing the pump in crooked, which rolls the grommet and causes a leak.</li>
<li>Over-tightening hose clamps or mounting screws and cracking plastic.</li>
<li>Connecting the front and rear hoses backward.</li>
<li>Forgetting to reconnect the electrical connector until after the reservoir is full.</li>
<li>Not checking the nozzles and lines for clogs.</li>
<li>Testing only the front washer and ignoring the rear washer, intermittent spray, or low-fluid warning.</li>
</ul>
<p>Practical tips:</p>
<ul>
<li>Lubricate the new grommet with clean washer fluid before inserting the pump.</li>
<li>Seat the pump fully by hand. Do not hammer or force it.</li>
<li>Fill the reservoir before the final test.</li>
<li>Run the washer for 10 to 15 seconds to prime the lines. If nothing sprays, check for kinked or clogged lines and nozzles.</li>
<li>Check for drips at the pump, grommet, and hose connections after five to ten minutes.</li>
<li>If the pump does not run, verify the fuse, relay, connector, and ground before assuming the new pump is defective.</li>
</ul>
<h2>Conclusion</h2>
<p>Most windshield washer pump removal mistakes on a minivan come from rushing, using the wrong tools, or assuming all models are the same. Confirm the pump location and mounting style, drain the reservoir, release electrical connectors properly, replace the grommet, and test the system before reassembly. Careful removal and correct installation prevent leaks, cracked reservoirs, and unnecessary repeat repairs.</p>