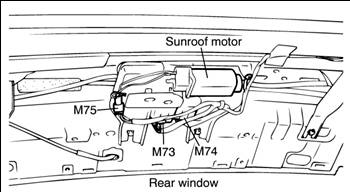
<p>The sunroof motor in a compact hatchback is a mechanical unit, but it sits inside a fabric-covered cover panel that forms part of the headliner assembly. Over time, heat, humidity, and UV exposure cause that foam-backed fabric to sag, peel, or stain — especially on cars parked outside. Reupholstering the motor cover and the surrounding headliner trim restores a clean interior, eliminates rattles caused by loose material, and costs far less than a replacement headliner. This guide covers the tools, removal sequence, fabric application, and reassembly steps for a typical compact hatchback such as a Golf, Fit, Mazda3, or Fiesta.</p>
<h2>Tools and Materials You Need</h2>
<p>Gather everything before you start. A missing tool mid-job means leaving adhesive to cure unevenly or trim panels hanging loose.</p>
<ul>
<li><strong>Fabric:</strong> 1–1.5 yards of 3mm foam-backed headliner fabric, color-matched to your existing interior</li>
<li><strong>Adhesive:</strong> High-temperature spray adhesive rated for 200°F+ (3M 90 or equivalent contact cement). Standard craft adhesive will fail in a sunroof car.</li>
<li><strong>Tools:</strong> Plastic trim pry bars, Torx T20/T25 bits, Phillips screwdriver, 10mm socket</li>
<li><strong>Cutting:</strong> Sharp fabric scissors, rotary cutter, fine-tip marker</li>
<li><strong>Cleaning:</strong> Isopropyl alcohol, lint-free cloths, stiff nylon brush</li>
<li><strong>Protection:</strong> Nitrile gloves, respirator, drop cloths</li>
</ul>
<p><strong>Practical tip:</strong> Buy 20% more fabric than you measure. Foam-backed material is unforgiving — one bad cut means a new order.</p>
<h2>Removing the Motor Cover and Headliner Trim</h2>
<p>Work in a warm, well-ventilated space. Cold fabric resists stretching and adhesive cures poorly below 65°F.</p>
<ol>
<li><strong>Disconnect the battery.</strong> Remove the negative terminal before touching sunroof electronics. This prevents the motor from cycling during reassembly and avoids fault codes.</li>
<li><strong>Lower the headliner.</strong> Remove the dome light lens, sun visors, grab handles, and A/B/C pillar trim. Most compact hatchbacks use clips and Torx fasteners — pry gently with plastic tools.</li>
<li><strong>Access the motor cover.</strong> On most hatchbacks, the sunroof motor sits behind a snap-in trim panel near the front of the headliner or above the rearview mirror. Release the clips with a pry bar.</li>
<li><strong>Remove the cover panel.</strong> Once unclipped, disconnect the motor harness if the panel carries a switch. Set the panel on a clean surface.</li>
<li><strong>Separate the fabric.</strong> Peel the old material back slowly, working at a low angle to avoid tearing the panel's fiberboard or plastic substrate. Use a scraper for stubborn adhesive.</li>
<li><strong>Clean the substrate.</strong> Scrub off all residual foam and glue with a nylon brush, then wipe with isopropyl alcohol. Any leftover foam creates lumps under the new fabric.</li>
</ol>
<p><strong>Practical tip:</strong> Photograph every connector and clip before removal. Reassembly is faster and you avoid mismatched harnesses.</p>
<h2>Cutting and Applying the New Upholstery</h2>
<p>This is the stage where patience matters more than speed.</p>
<ul>
<li><strong>Trace, don't guess.</strong> Lay the old fabric face-down on the new material and trace it. Add 1.5 inches of overlap on all sides for wrapping.</li>
<li><strong>Cut with a steady hand.</strong> Use a rotary cutter on a cutting mat for clean edges. Ragged cuts show through once installed.</li>
<li><strong>Apply adhesive in sections.</strong> Spray both the panel and the fabric backing, then wait 5–10 minutes until tacky. Contact adhesive bonds instantly on contact.</li>
<li><strong>Work from the center outward.</strong> Press the fabric down with a soft roller or your palm, pushing air toward the edges. Trapped air shows as bubbles under a headliner.</li>
<li><strong>Relief-cut the corners.</strong> Snip small V-notches at curves and corners so the material wraps without creasing.</li>
<li><strong>Wrap and tuck.</strong> Fold the excess over the panel edges and press firmly. For motor covers with retaining tabs, trim the fabric away from clip slots so the panel seats properly.</li>
</ul>
<p><strong>Practical tip:</strong> Never stretch foam-backed fabric more than about 5%. Over-stretching thins the foam and creates visible light spots in sunlight.</p>
<h2>Reassembly and Fit Checks</h2>
<p>Let the adhesive cure fully before reinstalling. Most high-temp sprays need 24 hours at room temperature.</p>
<ol>
<li><strong>Reconnect the motor harness</strong> and test the sunroof while the headliner is still lowered. Confirm smooth operation through open, close, and tilt cycles.</li>
<li><strong>Calibrate if needed.</strong> Many compact hatchbacks require a sunroof reset sequence — typically holding the switch in the close position for 10–15 seconds after a battery disconnect. Check your owner's manual.</li>
<li><strong>Reinstall the cover panel.</strong> Seat clips by hand first, then press firmly until each one audibly snaps.</li>
<li><strong>Reattach the headliner.</strong> Work in reverse order of removal. Tighten Torx fasteners by hand — over-torquing cracks plastic bosses.</li>
<li><strong>Inspect the finish.</strong> Run a hand along the edges for loose material and re-glue any lifting corners with a small dab of contact cement.</li>
</ol>
<p><strong>Practical tip:</strong> Wait a full week before parking in direct sunlight. Heat accelerates curing and can shift freshly bonded fabric if it hasn't fully set.</p>
<h2>Conclusion</h2>
<p>Reupholstering the sunroof motor cover on a compact hatchback is a weekend project that demands high-temperature adhesive, careful panel removal, and controlled fabric application. The mechanical motor itself rarely needs replacement — it's the trim around it that fails. Gather the right materials, clean the substrate thoroughly, work the fabric from the center outward, and let the adhesive cure before reassembly. Done correctly, the result is a tight, factory-looking headliner that survives summer heat for years.</p>