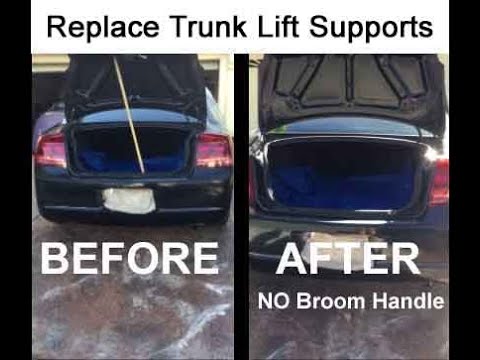
<p>A worn trunk lift support is a small problem that becomes a large one on track day. A trunk that won't stay open slows down tire changes, tool access, and post-session checks. Worse, a weak strut can let the lid drop onto your head or your helmet. Upgrading the gas struts is a one-hour job that pays back every session. This guide covers how to choose the right replacement and install it correctly.</p>
<h2>Why Upgrade the Trunk Lift Support?</h2>
<p>Track cars put unique demands on trunk hardware.</p>
<ul>
<li><strong>Weight reduction:</strong> Factory struts are often heavier than needed. Aluminum or composite-bodied replacements cut grams that matter in a class-limited build.</li>
<li><strong>Heat and vibration:</strong> Track use cycles the trunk far more than street driving. Cheap struts lose gas pressure quickly under constant vibration.</li>
<li><strong>Gutted interiors and cages:</strong> Removing interior panels changes the load on the trunk lid. Stock struts may no longer hold it open.</li>
<li><strong>Aero and pins:</strong> If you run trunk pins or a lightweight composite lid, the original strut force may be wrong — too strong can bow a carbon panel; too weak won't hold it.</li>
<li><strong>Quick access:</strong> Reliable struts let you open the trunk one-handed, which matters when you're in a hurry between sessions.</li>
</ul>
<p>A failing strut is also a safety item. A lid that slams shut mid-service can damage paint, wiring, or a hand.</p>
<h2>Choosing the Right Lift Support</h2>
<p>Getting the spec right is 80% of the job. Match these parameters.</p>
<ul>
<li><strong>Extended and compressed length:</strong> Measure your current strut fully extended and fully compressed. A replacement must match both, or the lid won't open fully or will bottom out.</li>
<li><strong>Force rating (Newtons or pounds):</strong> This determines how much lift it provides. Too weak and the lid won't stay up; too strong and it can stress mounts or pop the lid open.</li>
<li><strong>Ball socket vs. eyelet ends:</strong> Match the mounting style exactly. Adapters exist but add play.</li>
<li><strong>Rod and body diameter:</strong> Thicker rods resist bending. For track use, favor a slightly larger rod.</li>
<li><strong>Gas type:</strong> Nitrogen-filled struts are standard. For high-vibration use, look for struts rated for industrial or motorsport duty.</li>
<li><strong>Temperature range:</strong> Track surfaces get hot. Choose struts rated for the temperature range you'll see.</li>
</ul>
<p>Practical tips:</p>
<ul>
<li>Weigh the trunk lid. Most manufacturers publish a force recommendation per lid weight. If you've swapped to carbon or fiberglass, recalculate.</li>
<li>Buy in pairs. Mismatched struts on a two-strut setup cause uneven loading and premature failure.</li>
<li>Keep the old struts as spares. They still work as a backup for a fraction of the cost.</li>
</ul>
<h2>Tools and Preparation</h2>
<p>Gather everything before you start.</p>
<ul>
<li>Safety glasses and gloves</li>
<li>Trim removal tools</li>
<li>Socket set (usually 10 mm or 12 mm)</li>
<li>Small flathead screwdriver for retaining clips</li>
<li>New lift supports</li>
<li>Silicone spray or white lithium grease</li>
<li>A helper or a prop rod to hold the lid</li>
</ul>
<p>Steps before installation:</p>
<ul>
<li>Park on level ground and set the parking brake.</li>
<li>Open the trunk and support it with a prop rod or a helper. Do not rely on the old strut.</li>
<li>Take photos of the mounting points before removal.</li>
</ul>
<h2>Step-by-Step Installation</h2>
<ol>
<li><strong>Support the lid.</strong> With the trunk fully open, place a prop rod or have a helper hold it. Never work under an unsupported lid.</li>
<li><strong>Locate the retaining clips.</strong> Most struts use a small metal clip at each ball socket. Pry it up gently with a flathead screwdriver.</li>
<li><strong>Remove the old strut.</strong> Pop the socket off the ball stud at each end. Work one end at a time to control the release.</li>
<li><strong>Inspect the ball studs.</strong> Check for wear, rust, or looseness. Replace worn studs; a sloppy mount will wear out the new strut.</li>
<li><strong>Install the new strut.</strong> Press the socket onto the ball stud until it clicks. Fit the retaining clip. Repeat on the other end.</li>
<li><strong>Verify orientation.</strong> Many struts are directional — the body end usually mounts low or as marked. Check the label or arrow.</li>
<li><strong>Test the lid.</strong> Close it slowly and open it. It should rise smoothly and hold at full extension without assistance.</li>
<li><strong>Lubricate.</strong> A light spray on the ball studs keeps them moving freely and quiet.</li>
<li><strong>Repeat on the other side</strong> if you have two struts. Do them one at a time to avoid dropping the lid.</li>
</ol>
<p>Practical tips:</p>
<ul>
<li>If the lid feels too stiff, you may have over-spec'd the force rating. Step down one size.</li>
<li>If the lid drifts down, the strut is under-spec'd.</li>
<li>Check the mounting brackets for cracks after the first track weekend. Composite lids can stress small brackets.</li>
</ul>
<h2>Conclusion</h2>
<p>Upgrading the trunk lift support on a track day car is a fast, low-cost job with real returns: safer access, less frustration, and a small weight saving. Measure carefully, match the force rating to your lid, and install in pairs. Do it once, correctly, and you won't think about your trunk again until the next upgrade.</p>