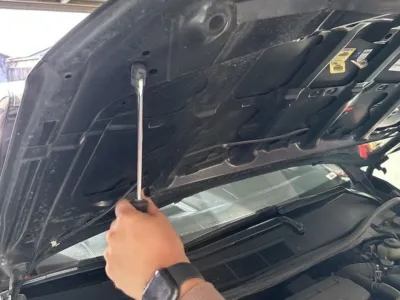
<p>The hood struts on a Toyota Camry are gas-charged cylinders that hold the hood open while you check fluids or work in the engine bay. Over time, the nitrogen charge escapes and the seals wear, causing the hood to sag, drop suddenly, or fail to lift. A weak strut is more than an annoyance — a hood that slams shut can cause serious injury. Inspecting both struts takes about ten minutes with basic tools, and it tells you clearly whether they can stay or need replacement.</p>
<h2>Before You Start: Tools and Setup</h2>
<p>Gather what you need and set up safely before touching anything.</p>
<ul>
<li><strong>Flashlight</strong> — for inspecting the cylinder body and mounting points</li>
<li><strong>Clean rag</strong> — to wipe away grime and check for fluid residue</li>
<li><strong>Work gloves</strong> — the metal rod and brackets can be sharp</li>
<li><strong>A helper or a prop rod</strong> — never trust a suspect strut to hold the hood</li>
<li><strong>Small flathead screwdriver</strong> — to pry retaining clips if needed</li>
</ul>
<p><strong>Confirm your Camry actually uses struts.</strong> Open the hood and look along the inner fender edges. Gas struts appear as black or silver cylinders roughly the length of your forearm, mounted between the fender and the hood, one on each side. Some Camry trims and older model years use a single manual prop rod clipped to the underside of the hood instead. If you see a prop rod, there are no struts to inspect.</p>
<p><strong>Setup tips:</strong></p>
<ul>
<li>Park on level ground with the engine off and fully cooled.</li>
<li>Cold weather reduces gas pressure inside the strut. Test at normal ambient temperature for a fair reading.</li>
<li>Have your helper hold the hood at full open, or use a sturdy prop, before you begin.</li>
<li>Never place your head or hands under a hood supported only by a strut you have not yet verified.</li>
</ul>
<h2>Step 1: Visual Inspection</h2>
<p>With the hood safely supported, examine each strut from top mount to bottom mount.</p>
<p><strong>Check the cylinder and rod:</strong></p>
<ul>
<li>Oil, grease, or dark streaks along the cylinder indicate a leaking seal — the most common failure.</li>
<li>Dents, bends, or rust pitting on the rod or body mean replacement.</li>
<li>Scratches or scoring on the piston rod damage the seal every time the hood moves.</li>
<li>A thin film of dust is normal; wet, oily residue is not.</li>
</ul>
<p><strong>Check the mounting hardware:</strong></p>
<ul>
<li>Cracked, dry, or missing rubber bushings at either end.</li>
<li>Loose, bent, or rusted brackets.</li>
<li>Ball studs that show movement or wear inside their sockets.</li>
<li>Retaining clips that are broken, missing, or bent out of shape.</li>
</ul>
<p><strong>Check the surrounding area:</strong></p>
<ul>
<li>Hood hinges for excessive play or bent arms.</li>
<li>Fender mounting points for cracks or elongated bolt holes.</li>
<li>Compare the left and right struts side by side. If one looks noticeably different from the other, that asymmetry is your first clue.</li>
</ul>
<h2>Step 2: Functional Tests</h2>
<p>Visual condition alone does not prove a strut still holds pressure. Run these five checks.</p>
<p><strong>1. The hold test.</strong> Raise the hood to full open, then let go and step back for five seconds. It should stay exactly where you left it.</p>
<p><strong>2. The sag test.</strong> With the hood fully open, mark or note the position, wait five minutes, and measure again. Any drop greater than an inch or two means the strut is losing charge.</p>
<p><strong>3. The resistance test.</strong> With the hood fully open, press down gently on the front edge. A healthy strut pushes back firmly and evenly. A soft, mushy, or easily overcome resistance indicates low pressure.</p>
<p><strong>4. The lift test.</strong> Close the hood completely, then lift it from the front edge. It should rise smoothly with steady assistance. Grinding, squeaking, or a jerky motion points to internal wear or a dry rod.</p>
<p><strong>5. The temperature check.</strong> If the hood holds well on a warm day but sags on a cold morning, the struts are near the end of their service life. Pressure loss in low temperatures is an early failure signal.</p>
<p><strong>Practical tip:</strong> Test one strut at a time by disconnecting the other at the top mount only if you can safely support the hood. This isolates which side is weak. Most owners find it simpler to replace both at once, since they wear at the same rate.</p>
<h2>Signs the Struts Need Replacement</h2>
<p>Replace the pair if you observe any of the following:</p>
<ul>
<li>The hood falls or sags on its own after release</li>
<li>The hood must be held up manually while you work</li>
<li>Slow, weak, or inconsistent lifting from the closed position</li>
<li>Hissing, grinding, or squealing during movement</li>
<li>Visible fluid leaking from the cylinder</li>
<li>Noticeable weakness in cold weather</li>
<li>A visible difference in performance between the left and right sides</li>
<li>More than 8–10 years of service on the original struts</li>
</ul>
<p><strong>Replacement notes:</strong></p>
<ul>
<li>Replace struts in pairs. A new strut paired with an old one creates uneven loading and premature wear.</li>
<li>Match the OEM part number, or choose a reputable aftermarket brand known for gas strut production.</li>
<li>Support the hood with a prop or a helper during the swap — the hood is heavier than it looks once both struts are removed.</li>
<li>Installation is typically a 10–15 minute job with basic hand tools, requiring no special equipment.</li>
<li>Tighten mounting bolts to the specification listed in your repair manual for your specific model year.</li>
</ul>
<h2>Conclusion</h2>
<p>Inspecting the hood struts on a Toyota Camry comes down to two things: looking for leaks, corrosion, and worn mounts, then testing whether the struts actually hold the hood up under load. If either strut leaks, sags, or feels weak in cold weather, replace both as a set. It is a low-cost job that takes minutes and eliminates the risk of a hood dropping on your hands or head.</p>