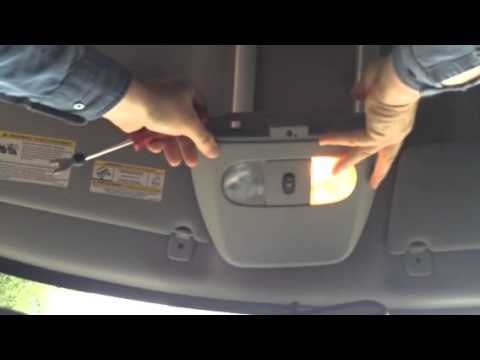
<p>A burned-out dome light is one of the easiest repairs a minivan owner can handle without a shop visit. Most minivans use one of three bulb designs, and the entire job — identifying the bulb, removing the lens, swapping the bulb, and testing the circuit — takes 10 to 20 minutes with basic hand tools. The main risk is cracked interior plastic, which is entirely avoidable with slow, even pressure instead of force.</p>
<h2>Tools and Materials</h2>
<ul>
<li>Replacement bulb (confirm the number before buying)</li>
<li>Plastic trim pry tool or a thin non-marring panel tool</li>
<li>Small flathead screwdriver</li>
<li>Phillips screwdriver (for screw-mounted lenses)</li>
<li>Needle-nose pliers</li>
<li>Nitrile gloves and a microfiber cloth</li>
<li>Multimeter or 12V test light (optional, but useful for diagnosis)</li>
<li>Flashlight or headlamp</li>
<li>Step stool for rear headliner lights</li>
</ul>
<p>Practical tips before you start:</p>
<ul>
<li>Warm the cabin if the temperature is below 50°F. Cold interior plastic becomes brittle and cracks easily.</li>
<li>Never pry visible trim with a metal tool. It leaves permanent gouges.</li>
<li>Work with the ignition off. Disconnecting the negative battery terminal is optional for a bulb swap but protects the socket if a tool slips.</li>
</ul>
<h2>Identify the Bulb Type and Confirm the Fault</h2>
<p>Minivans usually have two or three dome lights — front overhead console, middle row, and rear cargo area — often sharing one circuit and one fuse.</p>
<p>Common bulb types:</p>
<ul>
<li><strong>Festoon</strong> (cylindrical with metal caps): 211-2, 578, DE3175, 6411. Lengths run 31–44 mm.</li>
<li><strong>Wedge base</strong>: 194, 168, T10.</li>
<li><strong>Bayonet</strong>: BA9s.</li>
</ul>
<p>How to confirm which one you need:</p>
<ol>
<li>Check the bulb chart in the owner's manual. This is the fastest method.</li>
<li>Remove the lens and read the number printed on the bulb base or stamped on the socket.</li>
<li>If the number is worn off a festoon bulb, measure it end to end with a ruler.</li>
<li>If the bulb looks intact, test the socket with a multimeter. With the switch on, you should read roughly 12.6 volts across the contacts. No voltage means the problem is a fuse, the switch, or a door-jamb switch, not the bulb.</li>
</ol>
<p>Buying tips:</p>
<ul>
<li>LED replacements must match the exact festoon length or wedge type. LEDs are polarity-sensitive — if one doesn't light, pull it and rotate it 180 degrees.</li>
<li>Avoid touching halogen bulb glass with bare fingers. Skin oils create hot spots and shorten bulb life.</li>
</ul>
<h2>Remove the Lens and Replace the Bulb</h2>
<p>Dome lights attach in four common ways:</p>
<ul>
<li><strong>Snap-in lens</strong> held by plastic tabs — the most common design.</li>
<li><strong>Screw-mounted lens</strong> with one or two small Phillips screws, sometimes hidden behind a diffuser.</li>
<li><strong>Whole-housing removal</strong>, where the entire assembly pops out of the headliner.</li>
<li><strong>Slide or twist lens</strong>, typically on rear lights, released with a quarter turn.</li>
</ul>
<p>Removal steps:</p>
<ol>
<li>Set the dome light switch to OFF.</li>
<li>Insert the plastic pry tool into the seam at the edge opposite the switch.</li>
<li>Apply pressure in small increments around the perimeter rather than at a single point.</li>
<li>Once one tab releases, hold the lens and free the remaining tabs by hand.</li>
<li>Set the lens on a soft cloth to avoid scratches.</li>
<li>If screws hold the housing, remove them and lower the assembly. Note the wire connector orientation before unplugging it.</li>
</ol>
<p>If the lens resists, stop and warm it with a hair dryer on low for 30 seconds.</p>
<p>Bulb replacement by type:</p>
<ul>
<li><strong>Festoon</strong>: Push the bulb toward one metal clip to compress the spring contact, lift the free end out, then release the other end. Install in reverse — compress one clip, seat the opposite end, and let the clip push back.</li>
<li><strong>Wedge base (194/168)</strong>: Grip the plastic base, not the glass, and pull straight out. Align the new bulb's flat base with the socket slots and push until seated.</li>
<li><strong>Bayonet</strong>: Push in and twist counterclockwise about a quarter turn. Install by pushing in and twisting clockwise until it locks.</li>
</ul>
<p>Additional tips:</p>
<ul>
<li>Clean corroded or green socket contacts with a pencil eraser or contact cleaner.</li>
<li>If festoon contact clips have lost tension, bend them slightly inward with needle-nose pliers.</li>
<li>Never force a bulb. If it won't seat, the base type or length is wrong.</li>
</ul>
<h2>Test and Reassemble</h2>
<p>Test before putting anything back together:</p>
<ul>
<li>Turn the switch to ON and confirm the new bulb lights.</li>
<li>Cycle through DOOR and OFF positions. Opening a door should trigger the light.</li>
<li>Check every other light on the same circuit — front, middle, and rear — since one fuse typically serves them all.</li>
</ul>
<p>Reassembly steps:</p>
<ol>
<li>Reconnect the wire harness if you removed the housing.</li>
<li>Align the housing's locating tabs and press it into the headliner until it clicks.</li>
<li>Reinstall screws finger-tight, then snug them. Overtightening cracks plastic.</li>
<li>Snap the lens back in, pressing evenly around the perimeter.</li>
</ol>
<p>If the new bulb still doesn't light, check the fuse for the interior lamp circuit. Then test the door-jamb switch and the headlight switch dimmer, which controls dome light brightness on many minivans. A bulb that works in one switch position but not another points to a faulty switch rather than a faulty bulb.</p>
<h2>Conclusion</h2>
<p>Replacing a minivan dome light comes down to three things: matching the bulb type, releasing the lens without forcing it, and testing the circuit before reassembly. The job takes under 20 minutes and costs little more than the price of a bulb. Keep a spare 194, 578, or DE3175 in the glovebox — those three types cover most minivans, and having one on hand turns a nighttime annoyance into a two-minute fix.</p>