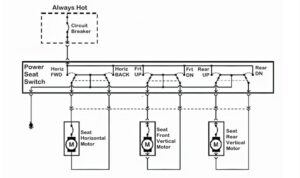
<p>Power seat switches in Class A motorhomes endure constant use, sun exposure, and the occasional spilled drink. When one fails, the seat stops moving in one or more directions, and the problem is often the switch rather than the motor. Replacing the switch is a straightforward job that takes most owners one to two hours with basic hand tools, and it costs a fraction of a dealership repair. This guide walks through diagnosis, parts sourcing, removal, and installation.</p>
<h2>Diagnose the Failure Before Buying Parts</h2>
<p>Confirm the switch is actually the problem. Seat motors rarely fail suddenly, while switches wear out gradually.</p>
<ul>
<li><strong>Test each function.</strong> Try forward, back, up, down, and recline. If only one direction is dead, the motor or wiring for that circuit may be at fault rather than the switch.</li>
<li><strong>Listen for clicks.</strong> A clicking relay or solenoid with no movement often points to a motor or ground issue.</li>
<li><strong>Check the fuse or breaker.</strong> Class A seats usually draw from the chassis battery circuit. Locate the fuse panel and verify the seat circuit.</li>
<li><strong>Inspect for corrosion.</strong> Pull the switch panel and look for green residue or moisture, common in humid climates and around windshield leaks.</li>
<li><strong>Test the motor directly.</strong> Apply 12 volts from a jumper pack to the motor leads. If the motor runs, the switch is the culprit.</li>
<li><strong>Feel the switch.</strong> Excessive looseness, sticking, or a spongy click indicates internal contact wear.</li>
</ul>
<p>If the motor runs when jumped and the fuse is good, replace the switch.</p>
<h2>Gather the Right Parts and Tools</h2>
<p>Matching the switch correctly saves a second teardown. RV captain's chairs are commonly built by Flexsteel, Villa, or Bradd & Hall, and switch assemblies vary by year and model.</p>
<p><strong>Parts:</strong></p>
<ul>
<li>Replacement switch matching your seat's pin count and connector shape</li>
<li>Butt connectors or solder and heat shrink</li>
<li>Dielectric grease</li>
<li>Contact cleaner</li>
</ul>
<p><strong>Tools:</strong></p>
<ul>
<li>Digital multimeter</li>
<li>Trim removal tools</li>
<li>Phillips and hex screwdrivers</li>
<li>Socket set with extensions</li>
<li>Wire crimpers and strippers</li>
<li>Zip ties</li>
<li>Shop light and your phone camera</li>
</ul>
<p><strong>Key tip:</strong> Photograph the switch, connector, and any part numbers before ordering. If the exact switch is discontinued, a universal three- or six-way seat switch can be adapted, but verify the wiring diagram first.</p>
<h2>Remove the Old Switch</h2>
<ol>
<li><strong>Disconnect power.</strong> Turn off both the chassis and house battery banks, or pull the seat fuse. This prevents shorts and blown fuses during the swap.</li>
<li><strong>Access the switch.</strong> On most Class A seats, the switch sits on the side of the seat base or in a panel under the cushion skirt. Remove the retaining screws and gently lift the trim.</li>
<li><strong>Photograph the wiring.</strong> Take clear photos of the connector and wire colors from multiple angles before touching anything.</li>
<li><strong>Disconnect the harness.</strong> Depress the locking tab and pull the connector straight out. Do not yank on the wires.</li>
<li><strong>Remove the switch.</strong> Some switches are held by plastic tabs that release with a small flathead screwdriver; others use two screws on the back of the bezel.</li>
<li><strong>Clean the area.</strong> Wipe out dust and debris and check for corrosion on the connector pins.</li>
</ol>
<p>If the seat must come out for access, unbolt it from the pedestal with a helper. These seats are heavy and awkward.</p>
<h2>Install the New Switch and Test</h2>
<ol>
<li><strong>Match the pin orientation.</strong> Compare the new switch to the old one. Most connectors only fit one way, but confirm before pushing.</li>
<li><strong>Seat the switch in the bezel.</strong> It should click or screw down flush with no wobble.</li>
<li><strong>Reconnect the harness.</strong> Push until the locking tab snaps. Apply a light coat of dielectric grease to the connector to resist moisture.</li>
<li><strong>Test all functions before reassembly.</strong> Reconnect power and cycle every direction. Listen for smooth motor operation with no binding.</li>
<li><strong>Troubleshoot if needed.</strong> If nothing works, recheck the fuse and the seat ground strap, which often bolts to the pedestal and corrodes over time.</li>
<li><strong>Secure the wiring.</strong> Zip tie loose harness slack away from moving seat tracks.</li>
<li><strong>Reassemble and torque.</strong> Reinstall trim and seat bolts, then tighten mounting hardware to spec.</li>
</ol>
<p><strong>Practical tips:</strong></p>
<ul>
<li>Work in a shaded area; plastic trim becomes brittle in direct sun.</li>
<li>Keep screws in a magnetic tray so they don't vanish into the seat mechanism.</li>
<li>If the switch fails again within months, check for a water leak above the seat.</li>
</ul>
<h2>Conclusion</h2>
<p>Replacing a power seat switch on a Class A RV is a manageable DIY repair that restores full seat adjustment for the cost of a part and an afternoon. Diagnose the circuit first, match the switch carefully, photograph everything before disconnecting, and test all functions before buttoning up the trim. With the right tools and a bit of patience, you'll avoid dealer labor rates and get back on the road with a fully functional seat.</p>