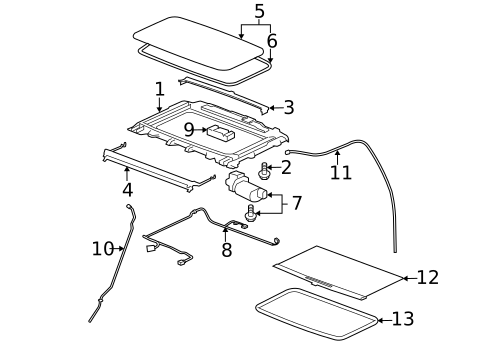
<p>A failed sunroof motor turns your truck's cabin from open-air comfort into a sealed box. When the motor dies, the glass panel usually stops moving, moves slowly, or gets stuck in a partially open position. Replacing the motor on a Chevy Silverado is a manageable DIY job that takes about one to two hours with basic hand tools. This guide covers the symptoms, tools, and step-by-step process to get your sunroof working again.</p>
<h2>Symptoms of a Bad Sunroof Motor</h2>
<p>Before ordering parts, confirm the motor is actually the problem. The switch, fuse, and track assembly can produce similar symptoms.</p>
<ul>
<li><strong>No movement at all</strong> – The glass doesn't respond when you press the switch, but you hear a faint click or nothing at all.</li>
<li><strong>Grinding or whining noise</strong> – The motor runs but the glass doesn't move, indicating stripped gears inside the motor housing.</li>
<li><strong>Slow or jerky operation</strong> – The panel drags or stops midway, often a sign of a weakening motor.</li>
<li><strong>Motor runs, glass stuck</strong> – This can also mean a broken cable or debris in the tracks, so inspect those first.</li>
</ul>
<p>Quick check: apply 12 volts directly to the motor connector with a jumper wire. If it still doesn't move, the motor is bad. If it moves, the problem is upstream — switch, relay, or wiring.</p>
<h2>Tools and Parts You'll Need</h2>
<p>Gather everything before you start. Most Silverado models (1999–2018 and newer) use similar procedures, though trim removal varies slightly by cab style.</p>
<p><strong>Parts:</strong></p>
<ul>
<li>Replacement sunroof motor (match your truck's year, cab, and sunroof type)</li>
<li>New motor mounting screws if not included</li>
<li>Dielectric grease</li>
</ul>
<p><strong>Tools:</strong></p>
<ul>
<li>Trim removal tools</li>
<li>Phillips and Torx screwdrivers (T20 and T25 commonly used)</li>
<li>Socket set with extension</li>
<li>Plastic pry bars</li>
<li>Torque wrench (optional but helpful)</li>
<li>Flashlight or work light</li>
</ul>
<p><strong>Tip:</strong> Take photos at each stage. Sunroof assemblies have small clips and brackets that are easy to forget during reassembly.</p>
<h2>Step-by-Step Removal and Installation</h2>
<h3>Step 1: Disconnect the Battery</h3>
<p>Remove the negative terminal from the battery. This prevents accidental sunroof activation and protects the electrical system while you work.</p>
<h3>Step 2: Remove the Headliner Trim</h3>
<p>The sunroof motor sits behind the headliner, usually near the front or rear of the sunroof opening.</p>
<ul>
<li>Lower the sunroof glass slightly if possible, or leave it closed based on your model's access point.</li>
<li>Remove the sun visors, grab handles, and overhead console if they block the headliner.</li>
<li>Carefully pull down the headliner edge near the sunroof to expose the motor. Don't crease the headliner — support it as you work.</li>
</ul>
<p><strong>Tip:</strong> On crew cab models, you may only need to drop the front section of the headliner rather than removing it entirely.</p>
<h3>Step 3: Disconnect the Motor</h3>
<ul>
<li>Locate the motor, a small rectangular unit bolted to the sunroof frame.</li>
<li>Unplug the electrical connector by pressing the release tab.</li>
<li>Remove the mounting screws (typically three or four). Support the motor as you remove the last screw so it doesn't fall.</li>
</ul>
<h3>Step 4: Remove the Old Motor</h3>
<ul>
<li>Pull the motor straight out of its housing. It may resist if the gears are engaged with the track cable.</li>
<li>If it won't budge, rotate the manual override (usually a hex or Allen key fitting) to disengage the gears.</li>
<li>Inspect the old motor's gear for stripped teeth to confirm the diagnosis.</li>
</ul>
<h3>Step 5: Install the New Motor</h3>
<ul>
<li>Apply a thin layer of dielectric grease to the connector terminals.</li>
<li>Align the new motor's gear with the track cable and slide it into place. Don't force it — rotate the override slightly to mesh the gears.</li>
<li>Reinstall the mounting screws and tighten them evenly in a star pattern.</li>
<li>Reconnect the electrical plug until it clicks.</li>
</ul>
<h3>Step 6: Test Before Reassembly</h3>
<p>Reconnect the battery and operate the sunroof through a full open-and-close cycle. Watch for smooth movement and listen for unusual noise. If the panel binds, stop immediately and recheck the gear alignment.</p>
<h2>Tips for a Smooth Job</h2>
<ul>
<li><strong>Work in warm conditions</strong> – Cold plastic trim cracks easily. If it's below 60°F, warm the interior first.</li>
<li><strong>Label screws</strong> – Different lengths are used throughout the headliner. A magnetic tray or labeled bag keeps them organized.</li>
<li><strong>Check the tracks</strong> – While the motor is out, clean the tracks and apply silicone-based lubricant. Dirty tracks kill new motors quickly.</li>
<li><strong>Reset the sunroof</strong> – Some Silverado models require a recalibration: hold the switch in the close position for several seconds after installation until the panel stops and clicks.</li>
<li><strong>Replace the fuse if needed</strong> – A blown fuse can mimic a dead motor. Check it before and after the job.</li>
</ul>
<h2>Conclusion</h2>
<p>Replacing the sunroof motor on a Chevy Silverado is a straightforward repair that saves significant labor costs at a dealership. Confirm the motor is faulty, gather your tools, and work carefully around the headliner and trim. With the new motor installed, test the full cycle before buttoning everything up, and keep the tracks clean and lubricated to extend the life of the replacement. Done right, the job takes an afternoon and restores full use of your truck's sunroof.</p>