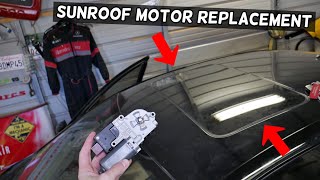
<p>A dead sunroof motor leaves the glass panel stuck open or closed, and the fix is often simpler than owners expect. Most minivans—Toyota Sienna, Honda Odyssey, Chrysler Town & Country, Dodge Grand Caravan, Kia Sedona—use a cable-driven sunroof with a small reversible motor mounted above the headliner near the roof opening. Replacing it is a moderate DIY job that takes one to two hours with basic hand tools. The critical steps are confirming the motor is actually at fault and keeping the sunroof in its timed position during the swap.</p>
<h2>Symptoms of a Failing Sunroof Motor</h2>
<p>Before buying parts, confirm the motor is the problem rather than the switch, fuse, or track.</p>
<ul>
<li>Nothing happens when you press the switch—no sound at all</li>
<li>Grinding, clicking, or whining noise with no panel movement</li>
<li>Sunroof moves slowly, stalls, or stops partway</li>
<li>Works intermittently, then quits after an inch or two</li>
<li>Fuse blows repeatedly when the switch is pressed</li>
</ul>
<p>Quick diagnostics:</p>
<ul>
<li>Check the sunroof fuse and swap the relay if equipped</li>
<li>Test the switch with a multimeter or by swapping in a known-good unit</li>
<li>Apply 12V directly to the motor connector—if it spins, the motor is fine</li>
<li>Use the manual override (usually an Allen key socket behind the overhead console) to move the panel; if it moves freely, the tracks and cables are likely intact</li>
<li>Inspect the tracks for debris, leaves, or broken plastic guides that can stall a healthy motor</li>
</ul>
<h2>Tools and Parts You'll Need</h2>
<ul>
<li>Replacement motor (OEM preferred; match the part number to your model year)</li>
<li>Trim removal tools</li>
<li>Phillips and Torx screwdrivers (T20 and T25 are common)</li>
<li>Socket set, typically 10mm</li>
<li>Needle-nose pliers</li>
<li>Flashlight or headlamp</li>
<li>Torque wrench (helpful for the small motor bolts)</li>
<li>Dielectric grease, clean rags</li>
<li>Plastic bags and tape to protect seats and interior panels</li>
</ul>
<h2>Step-by-Step Replacement</h2>
<h3>1. Disconnect the Battery</h3>
<p>Remove the negative battery cable and wait a few minutes. This protects you and prevents fault codes from the overhead console electronics.</p>
<h3>2. Access the Motor</h3>
<p>The motor sits above the headliner near the sunroof opening. Access varies by model:</p>
<ul>
<li>Some minivans have a small access panel in the headliner—the fastest route</li>
<li>Others require removing the overhead console, map lights, sun visors, grab handles, and A-pillar trim</li>
<li>On most models you only need to lower the front of the headliner, not remove it completely</li>
</ul>
<p>Work slowly with plastic trim tools. Cold plastic cracks easily.</p>
<h3>3. Position the Sunroof Before Removal</h3>
<p>Most sunroof motors must be synchronized with the panel. If the sunroof opens, set it to fully closed or fully tilted before pulling the motor. If it's stuck, use the manual override to close it. Mark the motor's orientation against the housing with a paint pen so the new unit goes in the same position.</p>
<h3>4. Remove the Old Motor</h3>
<ul>
<li>Unplug the electrical connector</li>
<li>Remove the mounting bolts, typically three</li>
<li>Support the motor with one hand as the last bolt comes out</li>
<li>Pull it straight out—do not twist, since the drive gear engages a cable or gearbox</li>
<li>Inspect the drive gear and cable end for stripped teeth or metal shavings</li>
</ul>
<h3>5. Install the New Motor</h3>
<ul>
<li>Confirm the new motor ships in the same position as the old one (most arrive in the closed position)</li>
<li>Align the drive gear with the cable or gearbox</li>
<li>Seat the motor and hand-tighten the bolts</li>
<li>Torque to specification, usually 5–7 lb-ft; overtightening cracks the housing</li>
<li>Reconnect the electrical connector</li>
</ul>
<h3>6. Reassemble and Test</h3>
<p>Reconnect the battery and test the sunroof before reinstalling trim. If it works, reinstall the console and trim in reverse order.</p>
<h2>Resetting and Testing the Sunroof</h2>
<p>Most minivans need a re-initialization after motor replacement.</p>
<ul>
<li>Turn the ignition to ON (engine off is fine)</li>
<li>Press and hold the close or tilt switch for 5–10 seconds until the panel twitches</li>
<li>Release and press again; the panel should cycle through tilt, slide, and close</li>
<li>Honda and Toyota models often need the switch held past full close for 3–5 seconds</li>
<li>If the panel reverses immediately or stops short, the motor is out of time—remove and reinstall with both the panel and motor in the closed position</li>
<li>Run three or four full cycles to confirm smooth operation</li>
</ul>
<p>If the new motor still doesn't respond, recheck the fuse, switch, and harness connector. A broken cable or damaged track mimics a dead motor and requires a full sunroof assembly repair.</p>
<h2>Practical Tips</h2>
<ul>
<li>Photograph the assembly before disassembly for reference</li>
<li>Bag and label bolts by location</li>
<li>Work in a warm garage; cold headliner material tears easily</li>
<li>Never force the panel—if it binds, stop and inspect the tracks</li>
<li>Lubricate the tracks with silicone or white lithium grease while you're in there</li>
<li>Check the sunroof drain tubes for clogs with the headliner down</li>
<li>Buy OEM; aftermarket motors often fail to sync correctly</li>
</ul>
<h2>Conclusion</h2>
<p>Replacing a sunroof motor on a minivan is a manageable repair for a patient DIYer. Confirm the diagnosis first, keep the panel and motor in matching positions, torque the bolts gently, and complete the reset procedure before reinstalling trim. Done correctly, the job costs a fraction of a dealership quote and restores full sunroof function in an afternoon.</p>