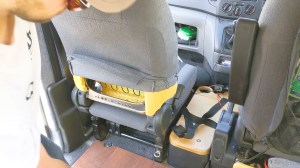
<p>The center console armrest in a Mercedes-Benz Sprinter is a convenient feature for daily driving, but it often becomes an obstacle in a camper van conversion. Whether you are installing a swivel seat base, building a custom galley, or simply need to reclaim space between the front seats, removing the armrest is a common modification. While the process is straightforward, it requires specific tools and a careful approach to avoid damaging the upholstery or the internal locking mechanism. This guide outlines the steps to safely detach the armrest without compromising the structural integrity of your console.</p>
<h2>Preparation and Necessary Tools</h2>
<p>Before you begin turning wrenches, it is essential to prepare your workspace and gather the correct tools. The Sprinter's interior plastics are durable but can scratch easily if handled with metal tools. Working in a clean, well-lit environment will prevent lost screws and frustration.</p>
<p><strong>Essential Tools:</strong></p>
<ul>
<li><strong>Trim Removal Pry Tools:</strong> Plastic wedges are mandatory for popping off plastic caps without gouging the material.</li>
<li><strong>Socket Set:</strong> You will typically need a 10mm, 13mm, or T25/T30 Torx bit, depending on your specific Sprinter generation (T1N, NCV3, or VS30).</li>
<li><strong>Ratchet and Extension:</strong> A short extension helps reach bolts located deep within the console housing.</li>
<li><strong>Microfiber Towels:</strong> To protect the leather or fabric upholstery during the process.</li>
<li><strong>Blue Painter’s Tape:</strong> Useful for securing screws to your tool or marking alignment points.</li>
</ul>
<p><strong>Safety First:</strong></p>
<ul>
<li><strong>Disconnect the Battery:</strong> If your console houses airbag sensors, wiring for the parking brake, or 12V outlets, disconnect the negative terminal of your starter battery. This prevents accidental short circuits or airbag deployment.</li>
<li><strong>Engage the Parking Brake:</strong> Ensure the van is stationary and the wheels are chocked.</li>
</ul>
<h2>Step-by-Step Removal Process</h2>
<p>The removal process generally involves accessing hidden fasteners beneath plastic covers. While designs vary slightly between model years, the logic remains consistent.</p>
<h3>1. Remove the Console Trim and Cup Holders</h3>
<p>Most Sprinter armrests are integrated into the lid of the center console storage bin.</p>
<ul>
<li>Open the console lid to expose the storage compartment.</li>
<li>Locate the torx screws at the bottom of the storage bin or inside the cup holder inserts.</li>
<li>Remove the rubberized cup holder liners to reveal hidden screws. In many NCV3 and VS30 models, removing these liners exposes the bolts that secure the entire console assembly to the floor.</li>
<li>Use your plastic pry tool to gently lift the plastic trim surrounding the shifter or handbrake. Work slowly around the perimeter to release the clips.</li>
</ul>
<h3>2. Detach the Armrest from the Lid</h3>
<p>If you are only removing the armrest pad (the leather top) and not the entire console:</p>
<ul>
<li>Inspect the hinge mechanism at the rear of the console lid.</li>
<li>Look for a small plastic cap or pin on the inner side of the hinge. Use a small flathead screwdriver or pick to pry off the cap.</li>
<li>Once the cap is removed, you will reveal a retaining pin or a Torx screw. Remove the pin or screw.</li>
<li>Gently tap the hinge pin out using a punch or a thin screwdriver. Support the armrest with your hand as you tap, ensuring it does not fall and damage the hinge or the console plastic.</li>
</ul>
<h3>3. Disconnect the Wiring Harness</h3>
<p>If your armrest or console includes electronic components (USB ports, 12V sockets, or lighting):</p>
<ul>
<li>Do not yank the armrest away once the bolts are removed.</li>
<li>Carefully lift the console or armrest to expose the underside.</li>
<li>Locate the wiring harness connector. Press the release tab on the connector and pull it apart gently.</li>
<li>If the wires are routed through a grommet in the console base, note the routing before pulling the unit free.</li>
</ul>
<h3>4. Unbolt the Main Console Bracket</h3>
<p>For full console removal:</p>
<ul>
<li>Remove the two bolts at the front of the console (often hidden under the cup holder or a small access panel).</li>
<li>Remove the bolts at the rear of the console (often located under a removable panel near the handbrake or in the rear storage bin).</li>
<li>Once all bolts are removed, lift the rear of the console first, then slide it backward to release it from the dashboard mounting points.</li>
</ul>
<h2>Addressing Common Challenges</h2>
<p>Even with the right tools, you may encounter sticking points. Here is how to handle them safely.</p>
<ul>
<li><strong>Stuck Bolts:</strong> If bolts are seized, apply a small amount of penetrating oil and wait 10 minutes. Do not force them, as you risk stripping the bolt head.</li>
<li><strong>Fragile Plastic Clips:</strong> Sprinter interiors are notorious for brittle plastic clips. If a clip breaks, do not panic. Replacement clips are inexpensive and available at most auto parts stores. Using a trim tool specifically designed for clips reduces breakage.</li>
<li><strong>Armrest Tension:</strong> Some armrests have a tension spring that can snap during removal. If you hear a pop, inspect the spring mechanism. It can usually be re-seated, but if the plastic housing is cracked, the armrest may need to be replaced.</li>
</ul>
<h2>Reinstallation Tips</h2>
<p>If you are removing the armrest temporarily (e.g., to install a swivel seat), reinstallation is the reverse of removal. However, keep these tips in mind:</p>
<ul>
<li><strong>Torque Specs:</strong> Do not overtighten bolts. The console base is often plastic or thin metal. Tighten until snug, then give a quarter turn. Overtightening can crack the mounting points.</li>
<li><strong>Cable Management:</strong> Use zip ties to secure any wiring harnesses away from moving parts (like the seat swivel) before bolting the console back down.</li>
<li><strong>Test Fit:</strong> Before fully tightening all bolts, test the movement of the seats and the handbrake to ensure the console is not interfering with operation.</li>
</ul>
<h2>Conclusion</h2>
<p>Removing the center console armrest in a Sprinter camper van is a manageable DIY task that opens up valuable space for your conversion. By using plastic trim tools, disconnecting the battery, and carefully managing hidden fasteners, you can avoid damage to your van's interior. Whether you are replacing the armrest or removing it permanently for a custom build, patience and the right tools are your best assets. Always double-check for hidden screws before applying force, and your Sprinter's interior will remain intact for the next stage of your build.</p>