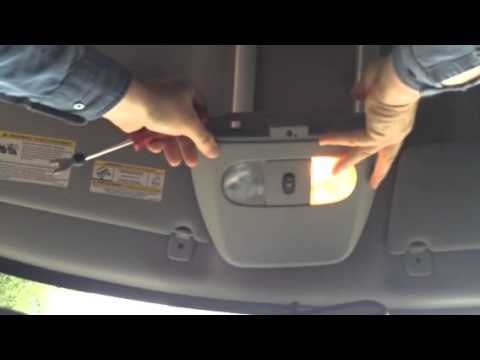
<p>The interior dome light in a Ford F-150 is a simple component, but removing it without damaging the lens, headliner, or wiring requires care. Depending on your truck’s generation and trim, the dome light may be a standalone lens in the headliner, part of an overhead console, or an LED assembly with a sealed housing. The basic process is similar: cut power, release the lens or housing, disconnect the electrical connector, and remove the bulb or assembly. Use plastic trim tools and steady pressure to avoid cracked plastic and torn headliner material.</p>
<h2>Prepare the Truck and Gather Tools</h2>
<p>Before you pry anything, set up a clean, well-lit workspace and make the truck safe.</p>
<ul>
<li>Turn off the ignition and remove the key. Set the dome light switch to OFF if your F-150 has one.</li>
<li>Close all doors or manually turn off the dome light so it does not stay powered while you work.</li>
<li>Wait several minutes if the light was on. Halogen and incandescent bulbs get hot enough to burn skin and melt plastic.</li>
<li>Disconnect the negative battery terminal if you plan to remove the housing or wiring. Use a 10mm wrench or socket, tuck the cable aside, and avoid letting it touch metal.</li>
<li>Put on safety glasses and nitrile gloves. Gloves protect against hot bulbs and keep oil from your fingers off replacement halogen bulbs.</li>
</ul>
<p>Recommended tools:</p>
<ul>
<li>Plastic trim removal tools</li>
<li>Taped flathead screwdriver</li>
<li>Phillips and Torx screwdrivers</li>
<li>Socket set</li>
<li>Needle-nose pliers</li>
<li>Microfiber cloth</li>
<li>Replacement bulb or LED assembly</li>
<li>Dielectric grease</li>
</ul>
<p>Keep small screws in a magnetic tray or labeled bag. F-150 interior fasteners are easy to lose inside the headliner.</p>
<h2>Remove the Dome Light Lens or Housing</h2>
<p>The exact removal method depends on the F-150 model year and dome light style. Most trucks use one of three designs: a snap-in lens, a screw-mounted housing, or an overhead console with separate map lights.</p>
<h3>Snap-in lens</h3>
<ul>
<li>Locate the small notch on one edge of the lens. It is usually on the side facing the rear or the outside of the vehicle.</li>
<li>Insert a plastic trim tool into the notch. Gently twist the tool to release the first clip.</li>
<li>Work around the lens perimeter with light pressure. Do not pry against the headliner fabric; use the plastic housing as your leverage point.</li>
<li>Lower the lens straight down once all clips release. If it resists, stop and check for a hidden screw.</li>
</ul>
<h3>Screw-mounted housing</h3>
<ul>
<li>Remove the lens first if it covers the screws.</li>
<li>Take out the Phillips or Torx screws. Support the housing with your free hand so it does not hang by the wires.</li>
<li>Use a trim tool to depress any metal or plastic retaining tabs along the edges.</li>
<li>Lower the housing slowly. For overhead consoles, remove trim screws and lower the console enough to reach the connector.</li>
</ul>
<h3>Overhead console or map lights</h3>
<ul>
<li>Pry out each map light lens individually. They often use the same notch-and-clip design.</li>
<li>Remove console screws located behind the lenses or under a trim cover.</li>
<li>Pull the console down gently. Do not yank it; wires for the dome light, map lights, and possibly sunroof or microphone may be attached.</li>
<li>Identify the dome light connector and leave the rest of the console supported.</li>
</ul>
<p>Practical tip: If the plastic feels brittle, warm the interior slightly with the truck’s heater before prying. Cold plastic cracks more easily.</p>
<h2>Disconnect the Bulb, Socket, or LED Assembly</h2>
<p>With the lens or housing lowered, you can access the electrical parts. The method varies by bulb type.</p>
<ul>
<li><strong>Bayonet bulb:</strong> Push the bulb inward, twist counterclockwise about a quarter turn, and pull it straight out.</li>
<li><strong>Festoon bulb:</strong> Release the spring-loaded metal contact at one end, then lift the bulb out. Do not bend the contact more than necessary.</li>
<li><strong>Wedge bulb:</strong> Pull the bulb straight out of its plastic socket. If it is tight, use a gentle rocking motion.</li>
<li><strong>LED assembly:</strong> Press the release tab on the wire connector and pull the plug apart. Do not pull on the wires themselves. Some LED boards are held by small screws; remove them before lifting the board.</li>
<li><strong>Sealed housing:</strong> If the dome light is a sealed unit, unplug the main harness connector and remove the entire housing. Replacement is usually the only service option.</li>
</ul>
<p>Inspect the connector for corrosion or melted plastic. Clean minor corrosion and apply a small amount of dielectric grease to the connector seals.</p>
<p>Practical tips:</p>
<ul>
<li>Take a photo of the wiring before disconnecting anything. It helps with reassembly.</li>
<li>Test the replacement bulb or LED before fully installing the housing. Reconnect the battery negative terminal briefly, turn on the dome light, and confirm operation.</li>
<li>If an LED does not light, flip the connector or bulb 180 degrees. LEDs are polarity-sensitive.</li>
<li>Do not touch halogen bulb glass with bare fingers. Oil creates hot spots and shortens bulb life.</li>
</ul>
<h2>Reinstall the Dome Light and Check Operation</h2>
<p>Reinstallation is the reverse of removal, but alignment matters.</p>
<ul>
<li>Plug the electrical connector in until it clicks.</li>
<li>Seat the bulb or LED assembly in its socket.</li>
<li>Align the housing tabs with the headliner openings. Press upward firmly but evenly.</li>
<li>Install screws by hand first, then snug them. Do not overtighten; plastic threads strip easily.</li>
<li>Snap the lens back into place. It should sit flush with the housing.</li>
<li>Reconnect the negative battery terminal and tighten it securely.</li>
<li>Test the dome light, map lights, and door-activated functions. Confirm the light turns off when the doors close.</li>
<li>If the light does not work, check the fuse box for a blown dome light fuse. Consult your F-150 owner’s manual for the fuse location and rating.</li>
</ul>
<h2>Conclusion</h2>
<p>Removing the interior dome light on a Ford F-150 is a straightforward job when you use plastic trim tools, cut power first, and release clips gently. Whether you are replacing a burned-out bulb, upgrading to LED, or repairing a faulty housing, the key is to avoid forcing plastic and to protect the headliner. Work slowly, keep fasteners organized, and test the light before snapping everything back together. With the right preparation, the job takes only a few minutes and leaves your truck’s interior clean and fully functional.</p>