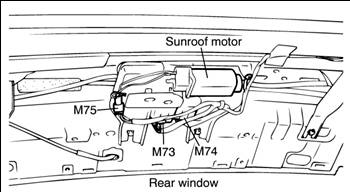
<p>A malfunctioning sunroof motor can turn a pleasant drive into a frustrating experience, especially when the roof gets stuck open during bad weather. In a Toyota Camry, the sunroof motor controls the sliding and tilting functions of the glass panel, and when it fails, you may hear grinding noises, clicking sounds, or nothing at all. This guide walks you through diagnosing and replacing a damaged sunroof motor so you can restore full function without an expensive trip to the dealership.</p>
<h2>Tools and Materials You'll Need</h2>
<p>Before starting, gather the following:</p>
<ul>
<li>Replacement sunroof motor (OEM or quality aftermarket)</li>
<li>Phillips and flathead screwdrivers</li>
<li>Trim removal tool</li>
<li>Socket set (typically 10mm and 12mm)</li>
<li>Torx bit set</li>
<li>Needle-nose pliers</li>
<li>Clean rags and mild cleaner</li>
<li>Dielectric grease</li>
<li>Flashlight or work light</li>
</ul>
<h2>Step 1: Diagnose the Problem</h2>
<p>Before replacing anything, confirm the motor is the actual culprit.</p>
<ul>
<li><strong>Check the fuse first.</strong> Locate the sunroof fuse in the interior fuse box and inspect it. A blown fuse mimics a dead motor.</li>
<li><strong>Test the switch.</strong> Listen for a click when pressing the sunroof button. If the switch feels loose or unresponsive, the issue may be electrical rather than mechanical.</li>
<li><strong>Inspect for obstructions.</strong> Debris or misaligned tracks can stall the motor. Clean the rails and lubricate them with silicone spray.</li>
<li><strong>Listen for symptoms.</strong> Grinding or whining indicates gear wear. Complete silence often means no power or a seized motor.</li>
</ul>
<p>If the fuse and switch are fine and the tracks are clean but the roof still won't move, the motor is likely damaged.</p>
<h2>Step 2: Remove the Sunroof Motor</h2>
<p>The motor sits behind the overhead console or headliner near the sunroof opening.</p>
<ol>
<li><strong>Disconnect the battery.</strong> Remove the negative terminal to prevent electrical shorts.</li>
<li><strong>Remove the overhead console.</strong> Use a trim tool to gently pry it down. Disconnect its wiring harness.</li>
<li><strong>Lower the headliner section.</strong> Remove the visor, grab handles, and trim pieces holding the headliner near the sunroof. Carefully pull the headliner down enough to access the motor.</li>
<li><strong>Locate the motor.</strong> It's a small cylindrical unit bolted to the sunroof frame, usually with two or three bolts.</li>
<li><strong>Disconnect the wiring.</strong> Unplug the electrical connector from the motor.</li>
<li><strong>Remove the mounting bolts.</strong> Use a 10mm socket or Torx bit to remove the bolts holding the motor in place.</li>
<li><strong>Extract the motor.</strong> Pull it straight out. If it's stuck, check for a retaining clip or a manual crank mechanism.</li>
</ol>
<p><strong>Tip:</strong> Take a photo of the wiring and mounting orientation before removal to simplify reassembly.</p>
<h2>Step 3: Install the New Motor</h2>
<ol>
<li><strong>Compare the new motor.</strong> Ensure the replacement matches the original in shape, mounting holes, and connector type.</li>
<li><strong>Align the drive gear.</strong> The motor's gear must mesh correctly with the sunroof track. Manually move the sunroof panel to its fully closed position before inserting the new motor.</li>
<li><strong>Insert and bolt the motor.</strong> Slide it into place and hand-tighten the bolts first, then torque them snugly. Avoid overtightening, which can crack the housing.</li>
<li><strong>Reconnect the wiring.</strong> Plug the harness back into the motor until it clicks.</li>
<li><strong>Test before reassembling.</strong> Reconnect the battery and press the sunroof switch. The motor should operate smoothly through open, close, and tilt functions.</li>
<li><strong>Reassemble the interior.</strong> Reattach the headliner, overhead console, visor, and trim pieces in reverse order.</li>
</ol>
<p><strong>Tip:</strong> If the sunroof moves in reverse, the wiring may be flipped. Double-check the connector orientation.</p>
<h2>Step 4: Reset and Calibrate the Sunroof</h2>
<p>Many Toyota Camry models require a calibration after motor replacement.</p>
<ul>
<li>Turn the ignition to ON without starting the engine.</li>
<li>Press and hold the sunroof switch in the "close" position for 5–10 seconds until the roof stops moving.</li>
<li>Release, then press and hold the "tilt up" position for another 5 seconds.</li>
<li>The roof should cycle through its range and stop automatically, confirming calibration.</li>
</ul>
<p>If the roof doesn't respond, check the fuse, wiring connections, and motor alignment again.</p>
<h2>Practical Tips for Longevity</h2>
<ul>
<li><strong>Lubricate tracks every six months.</strong> Use silicone-based grease, not petroleum jelly, which attracts dirt.</li>
<li><strong>Clean the seals.</strong> Dirt buildup strains the motor over time.</li>
<li><strong>Avoid forcing a stuck roof.</strong> Manual pressure can strip the gears.</li>
<li><strong>Use the sunroof regularly.</strong> Occasional use keeps the motor and tracks from seizing.</li>
</ul>
<h2>Conclusion</h2>
<p>Fixing a damaged sunroof motor on a Toyota Camry is a manageable DIY job with basic hand tools and careful attention to detail. Diagnose the issue first, remove the old motor safely, install the replacement correctly, and recalibrate the system. With proper maintenance, your Camry's sunroof will operate smoothly for years to come. If the problem persists after replacement, consult a qualified mechanic to check for deeper electrical or mechanical faults.</p>